

AARP Eye Center


A Home 'Fit' Remodeling Project: Finishing Touches
By Carolyn Sithong, October 19, 2015 03:46 PM
This is the final post in an AARP Livable Communities blog diary about a home remodeling project that is stylishly updating a Florida house (referred to here as the “Cate house”) while making it better suited for aging in place. To see photos of the entire project, follow the slideshow link at the end of this post.

From start to finish, remodeling the Cate house cost about $50,000 and took four months of renovation and construction work. Every space in the home was touched in some way, whether it was by a fresh coat of paint or through a more extensive structural change. The following spaces received particular attention:
>> GET LIVABLE! Subscribe to the award-winning AARP Livable Communities Monthly eNewsletter
The Entry: The house already had a covered porch that’s easily accessible from the flat driveway, so no changes were needed there. At the front door the raised threshold was replaced with a flatter one so the home has a true no-step entrance. Other new front door features include automatic outdoor lighting, lever-style (as opposed to knob) handles, a 36-inch door width with a swing-in hinge to provide an unobstructed opening (suitable for wheelchair access, if needed) and a large etched-glass window that provides both privacy and the ability to see who’s at the door.
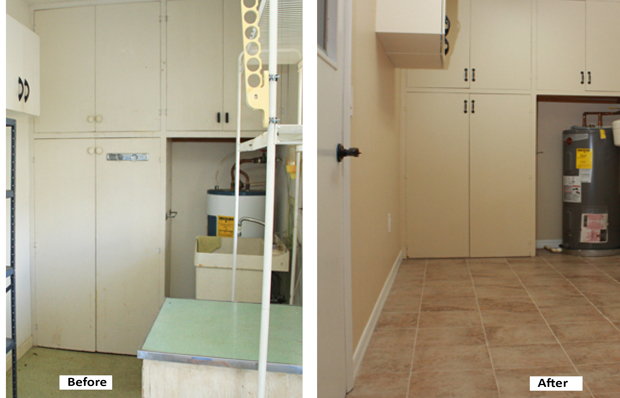
The Laundry Room: A no-step door opening was created to provide access directly from the house to the laundry room. (Previously, access was only through the garage.) A window-unit air conditioner was replaced by central air.
Space was made to accommodate front-loading washer and dryer units that can be used from, if necessary, a seated position.
The area also features new tile flooring and multiple-height shelving to store detergent and other household items.
The Bathrooms: The home’s main bathroom already contained a walk-in tub. The work here improved the room’s lighting and expanded the floor space to allow better maneuverability by stealing space that was being used by the adjacent closets in the hallway and guest bathroom.

The room’s traditional swing-in door was replaced by a pocket door that allows full use of the doorway’s 36-inch clearance. A cabinet-like vanity was replaced by pedestal sink, which also opens up the floor space and provides leg room for a person to sit while using the sink and large mirror. Lever-style faucet handles replace harder-to-use knobs. The room’s fixtures (faucet, handles, grab bars) have a bronze finish that provides a good visual contrast against the white sink and walls.
In the master bathroom, the unappealing stall shower was re-tiled and attractive safety grab bars were added. A handheld shower track was installed so a user could place the shower head in the best location for showering while standing or while sitting on a shower seat. A comfort-height toilet was installed as was a nearby decorative grab bar. Grooves along the inside of the grab bar allow for a secure grip, and the finish matches the faucets and complements the room’s chosen color scheme.
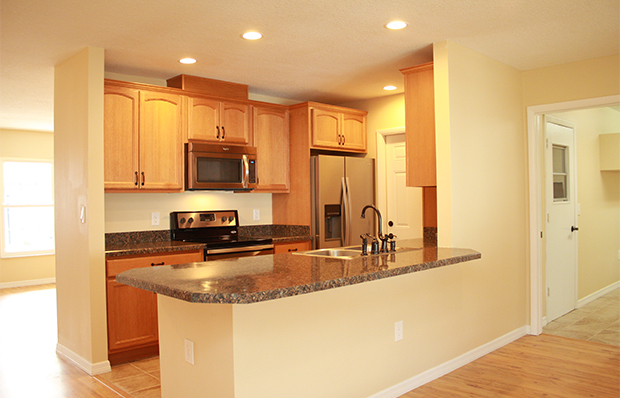
The Kitchen: As the room most transformed by the remodel, the kitchen was completely opened and expanded to blend it and the family room as a shared space.
New cabinets and a pantry with pull-out drawers provide accessibility at sitting and standing levels. Under-cabinet lighting and lighting above the range and sink are important when cutting vegetables, washing dishes and working at the stove. Knee space to allow sitting during meal preparation is provided beneath the countertop that extends into the living room. A double-sided refrigerator provides equal access to both the freezer and refrigerator, and the ice maker and water dispenser are convenient for anyone in the home. The dials on the stovetop are a contrasting color against the background, which makes it easier to see the burners and temperature options. The contrasting-color kitchen faucet and lever-style handles are among the benefits of the new stainless steel sink.
***
Mark Muti
Remodeling to design for a lifetime always has its challenges, but working with the right professionals can eliminate common mistakes and ever having to say, “I wish I’d have known that.” Because occupational therapists are focused on function and the independence of the clients they serve, their design and product suggestions often provide the best outcomes, especially when paired with the experience skilled home builders and designers can bring to the table.
See More Photos: A Home Remodeling Before and After Slideshow
All the posts in this series: 1. Getting Started. 2. Finding the Experts. 3. The Entryway. 4. The Bathroom. 5. The Kitchen. 6. The Living Space. 7. Finishing Touches. Plus: A Home Remodeling Before and After Slideshow
Carolyn Sithong is a licensed occupational therapist (OT) specially certified in environmental modifications, Certified-Aging-in-Place Specialist (CAPS), volunteer AARP Florida HomeFit instructor and co-owner of Home for Life Design, a company based in Orlando. Learn more at homeforlifedesign.com.
YOU MAY ALSO LIKE
- AARP HomeFit Guide: Smart Solutions for Making a Home Safe, Comfortable and a Great Fit
- Slideshow: Take a Tour of a ‘Lifelong’ Home
- Why Tiny Houses Are Becoming a Big Deal
- Watch the AARP HomeFit Video