AARP Eye Center
Get Cooking With a DIY Solar Oven
By Jeff Yeager, August 5, 2013 09:38 AM
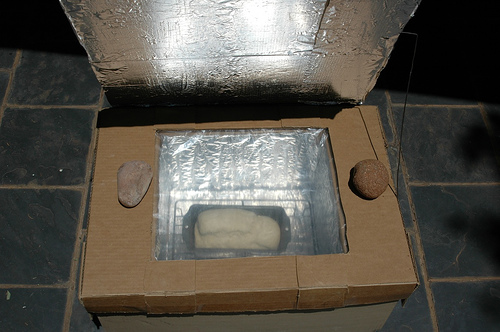
With plenty of sunny days still ahead - but with summer vacation nearing its sunset for kids and grandkids - here's a fun, inexpensive and educational project to do with the young people in your life during the dog days of summer. Build a simple solar oven (aka a "solar cooker") from repurposed household items. It will not only amaze and amuse kids of all ages, but it really works. And it will save you money and keep the heat out of the kitchen, unlike a conventional oven.
Here's how:
- Find two medium or large cardboard boxes, one a few inches smaller than the other so that it will fit inside the larger box.
- The smaller box will be the cooking chamber. Cut the top flaps off of that box, and tape the bottom flaps to secure them. Cut a piece of black construction paper to cover the inside bottom of the smaller box, then cover the four inside side panels of that box with aluminum foil, gluing or taping the foil to the sides so that it stays in place. So, to summarize, the inside of the smaller box is now lined with aluminum foil on all four sides and the bottom of that box is covered with a piece of black paper.
- Next, crumple up pieces of newsprint and place them inside the larger box, so that when you set the smaller box inside the larger box, the tops of the two boxes are equal in height. Then wad up additional newsprint and stuff it in snugly around the sides of smaller box. You are creating an insulating area between the smaller box and the larger box. Note that foam "packing peanuts" can also be used instead of newsprint to provide the insulating layer.
- Cut a piece of glass (careful!) or clear plastic to fit precisely over the top of the larger box, so that when you place it on top, it's covering both the larger box and the smaller box inside.
- Cover the insides of the four flaps of the larger box with aluminum foil (gluing/taping in place), to use to reflect the sun's rays through the glass and into the cooking chamber. Place the solar oven in direct sunlight, and bend and adjust the reflector flaps as needed to maximize the amount of solar energy entering the cooking chamber.
- Food to be cooked should be placed in the cooking chamber (under the glass), ideally on a black or other dark colored cooking tray or ovenproof dish. Put a cooking thermometer in the cooking chamber to gauge the heat level and experiment with different ways to position the oven and the reflector flaps to achieve the desired amount of heat.
Even though some solar ovens can achieve cooking temperature of 300 degrees or more, they typically cook low and slow, kind of like a crockpot. There are many different plans and designs for building your own solar oven in addition to the one described here, including these detailed plans from the U.S. Department of Energy and even solar ovens made from pizza boxes. And if you really want to get into cooking with sunshine, you can buy a commercially made solar oven starting at about $50, which will reduce your utility costs and keep you out of the kitchen. Now that's hot!
Photo: Abri Beluga/flickr
Also of Interest
- Cheap Tips for the Outdoors
- Paying for College With Your Retirement Funds? Don't.
- Join AARP: Savings, resources and news for your well-being
See the AARP home page for deals, savings tips, trivia and more

