AARP Hearing Center
A Home 'Fit' Remodeling Project: Getting Started
By Carolyn Sithong, March 3, 2015 09:10 AM

As an occupational therapist and aging-in-place consultant, I am frequently asked to assess a home for its ability to meet the functional needs of the people who are or will be living in it.
Sometimes I’m called in by a caregiver who needs advice about how to make bathing or transporting a resident of the home easier. Other times I’m consulting for retirees who want to redesign their home for accessibility due to common aging ailments such as arthritis, diminished vision or limited mobility. To me, lifelong livability is part of what makes a house or apartment a healthy home. No one should have to say “I used to cook” or “I used to garden” because their home prevents them from doing either.
>>STAY INFORMED ! Subscribe to the award-winning AARP Livable Communities Monthly eNewsletter
More than 80 percent of people over the age of 45 say they want to remain in their home forever — or at least for as long as possible. However, less than 10 percent of the nation’s housing stock has the accessible and age-friendly features that make aging in place easy to do. Over the next several weeks I’ll be helping create one of these much-needed homes. I’ll be reporting on the process via a blog diary here on the AARP Livable Communities blog.
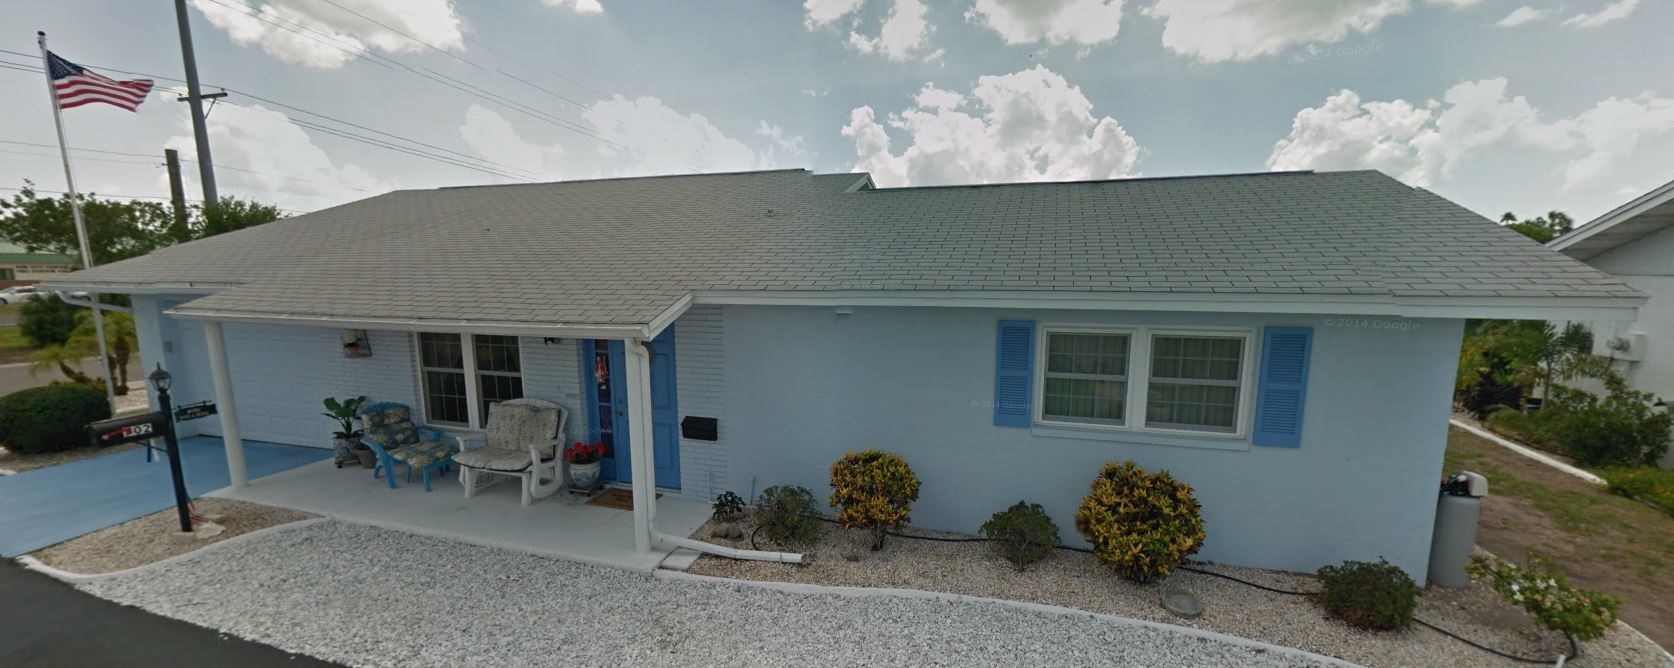
The house I’m working on (that's it, above) was built in 1976 and is located in a retirement community outside of Tampa, Fla. A 1,150-square-foot, two-bedroom, two-bathroom, one-story house, the property was purchased in November 2014 by John Cate, a seniors real estate specialist (SRES). His plan is to remodel the house, which sold for $63,650, by using attractive “universal design” features and then sell it to a buyer who wants a move-in-ready, age-friendly home.
A residence that’s been built or remodeled using universal design (often called UD) principles is designed and constructed in a way that it is attractive and useful to all residents and visitors, regardless of whether they have limitations or specialized needs. Common universal design features can include:
- At least one no-step, weather-protected entrance into the home
- A full bathroom on the first floor
- Easy access to spaces where important living tasks, like bathing, cooking and socializing, occur
(Note: Aspects of a home that enable aging in place and remaining active can include but are not limited to using universal design principles. For instance, a home’s location and condition are important factors as well. Also, although the terms “universal design” and “accessibility” are often used interchangeably, UD is about using specific design components, while accessibility involves enabling a person to have access to certain or all areas of the home.)
The owner and I share the goal that the house’s aging-friendly features will not make the home look or feel as if it’s been specially designed for “an old person” or a person with physical disabilities. The home’s functionality and appearance are very important considerations.
Good features the house already has:
- A covered access from the garage, with a small 4-inch step
- A walk-in tub in the guest bathroom
- An open floor plan
Among my recommendations:
- Create a no-step entry from the garage.
- Add increased and/or sensor-activated lighting at all entrances.
- Vary the kitchen counter heights (to accommodate sitting and standing).
- Provide a full-height kitchen pantry.
- Replace the refrigerator with a model that has side-by-side doors for the refrigerator and a pull-out freezer below.
- Consider using space from the hallway linen closet and the second bedroom to provide a 5-by-5-foot turning radius in the second bath.
- Increase the bathroom door width to at least 32 inches and consider installing a pocket door or side-by-side barn-style door to avoid door swing into the bathroom.
- Replace the loose, fake grass carpeting in the lanai with tile flooring that has a matte or textured finish.
- Place raised garden beds in the covered porch area.
- Increase the safety of the exterior walkway by removing the rocks and adding pavers.
The next step is a meeting with John, the remodeler and myself to determine which upgrades and fixes are financially feasible. This will help finalize a plan for moving forward. (See Post No. 2.)
All the posts in this series: 1. Getting Started. 2. Finding the Experts. 3. The Entryway. 4. The Bathroom. 5. The Kitchen. 6. The Living Space. 7. Finishing Touches. Plus: A Home Remodeling Before and After Slideshow

YOU MAY ALSO LIKE


